During the fifty-something-ish years since I arrived on this planet I’ve collected/accumulated a heck of a lot of badges and keyrings and the like… This is just a small sample:

(Not shown: the hundreds — yes, literally hundreds — of membership badges that Leonia and I have collected in three decades of attending science fiction, fantasy and comic conventions. They’re all properly stored in a filing cabinet along with all the souvenir books and the like from those events.)
I’ve been keeping most of them in an old plastic lunchbox, but I finally decided it was time to get a little more organised. I figured I needed something like this:

Sadly, professionally-built small-object-storage cabinets of this nature are not free in this universe, and in fact can cost upwards of several thousand cents. I can’t justify such a lavish luxury. (I’ll spare you the full details of my financial status, save to say that I have had better years than this. On the positive side, though, I can’t imagine that I’ll ever have any worse years.) Insert sad-face emoticon.
If only there was some way I could acquire one of those cabinets without spending any money…
I could make one out of wood, but that particular material is vastly expensive these days and would end up costing more than a plastic one. I could make one out of metal, but that’s even more expensive and very tricky and actually I wouldn’t be able to do that: apologies for the lie.
However, I do have an awful lot of this stuff knocking around:
Corrugated cardboard! It comes free in box-form with big items and I have a tendency to hoard the larger boxes in case I ever need to post something hefty, or to use as cutting-mats, or in place of drop-cloths when decorating (I’ve found that large sheets of cardboard are easier to manoeuvre than drop-cloths, and much less of a trip-hazard).
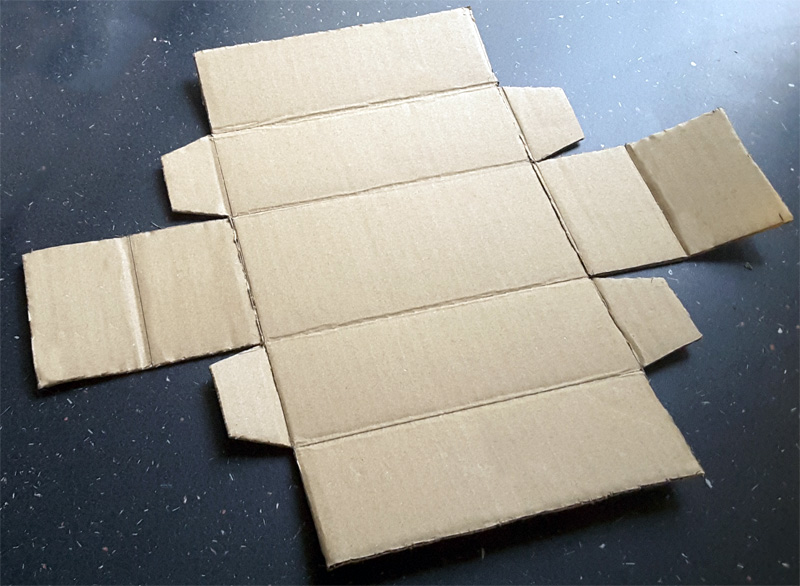
So I sliced up some of the less grubby and mangled boxes into rectangles around 400mm by 300mm, then on one of them I drew a template something like this:

The black line is for cutting, the white line is for folding… A few minutes’ careful slashing with The Knife of Mr Stanley, and we end up with one of these:
Next step is to spread a thin smear of glue (standard wood-glue works fine) on the bits marked in red…

It’s a tad fiddly to get it all folded up (the ends fold over the little tabs, then the sides are folded in), but before too long we should have a nifty little open-topped box like this:

Small clamps or bulldog clips are handy to keep the sides nice and tight while the glue dries. This takes about ten to fifteen minutes, so we use that time to cut out another rectangle the same width as the box’s base, but about 40mm longer. We glue this to the base, leaving the long bit sticking out past one end to make another tab (for extra fancy decoration, I’ve clipped the corners on mine):

Hooray! Our wee box is now a little drawer! Next step is to do it all again… fifteen more times.
(Note: I didn’t actually glue-up that first one because that was the template: I opened it out again, put it on a fresh sheet of cardboard and carefully drew around it. When doing something like this it’s worth investing a bit of time to make the template as accurate as possible, and use that same template to make all the others. Don’t be tempted to use one of the later ones as a new template instead because that runs the risk of compounding any errors.)
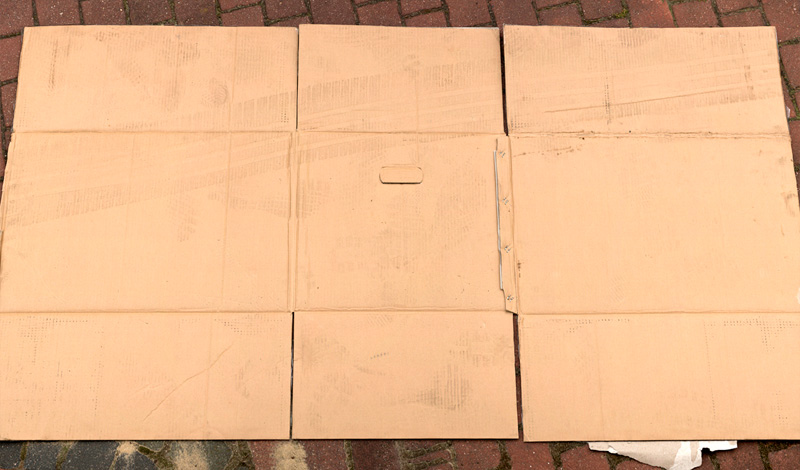
With the drawers done, it’s time to make the actual storage unit, this time using thicker, double-corrugated cardboard boxes. It’s a very straightforward process, though not straightforward that I was able to remember to take photos of every stage. Sorry about that. But I did take this one:

That’s one of the horizontal shelves. The slots are a tad over half the width of the piece, and the same thickness as the cardboard itself. The gaps between the slots are a few millimetres wider than the drawers.
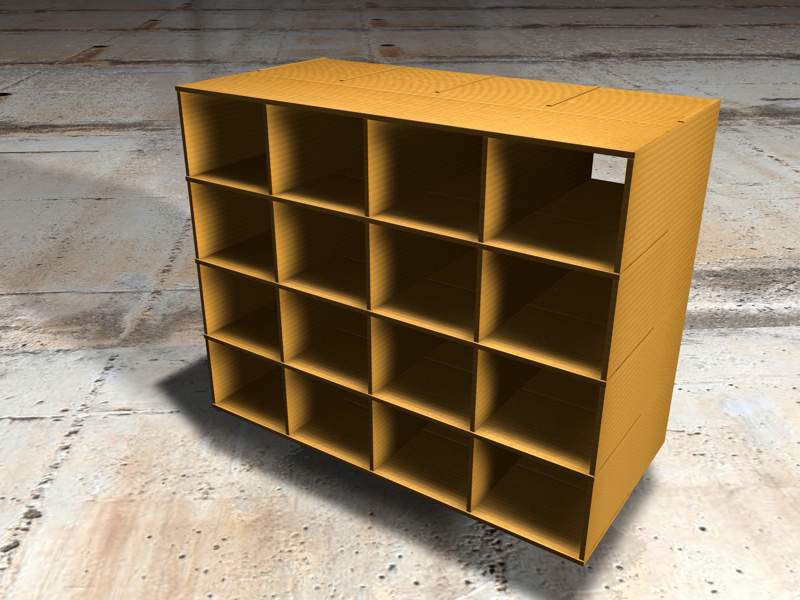
I made five of these, then another five vertical versions (with the spacing between the slots a little taller than the drawers). All the pieces fit together as seen in this super-duper high-tech “computer simulation”:

Again, accuracy is important: if the slots are too wide the whole thing will end up quite flimsy, too narrow and you’ll risk mangling the thing trying to get it to fit, and if the slots aren’t placed properly it won’t go together at all. So take your time, plan it all out, measure everything at least twice before you cut, and use a very sharp knife — and a carpenter’s square if you have access to one.
Ta-daa! As before, wood glue is good enough to stick it all together, although if you’ve been very careful and accurate when cutting the slots that you might be able to get away without any glue at all.
To finish up, I reinforced the top, bottom and sides with more sheets of single-layer cardboard, added a back panel (so that the drawers wouldn’t shoot out the back if I pushed them in too fast), and then remembered that out in the shed I had a long piece of extremely strong, dense and rigid cardboard already formed into a right angle: I had to use the table saw to slice that up because there was no way Mr Stanley’s Knife was up to that task, then glued the chunks to the corners for extra stability.
The final object (looking a lot more bockety and amateur than the CGI version)…

It’s not as neatly finished as I’d like.. See the quite ragged top edge? That’s because my blade was getting blunt, but I was close to finishing and didn’t want to take the time to sharpen it. Dumb mistake! But it’s solid and strong, and, hey, this isn’t a beauty contest!
I might have another go at making one somewhere down the road (maybe out of wood if the prices ever get back to normal: 3mm plywood would be ideal) but for now I’m happy with it: it serves the purpose for which it was created, helps keep the badges organised*, and only takes up about three times the amount of space as the old plastic lunchbox they used to be stored in. I’d call that a success!
Total cost: €0.00 for the cardboard, maybe a few cents for the glue. Build time: a little under four hours.
* Full disclosure: the badges didn’t actually need to be organised because I almost never wear any. But sometimes you have to make something because the idea gets into your head and lodges there, like a double-mattress trapped half-way up a spiral staircase, until you do something about it.
Addendum, 20231101. Since this post went on-line a year ago lots and lots (and lots) of people have “helpfully” — and in some cases repeatedly — informed me that the best way to store badges is on a large piece of cloth or a cork board. Yes, I did think of that, thank you. Please stop. And fer cryin’ out loud, guys… This is not about the badges. It’s about making a cheap but useable Small Objects Storage Unit — you can use it to store other objects.
See my other builds on this blog:


Absolutely love it, Mike. You put all us other cardboard craft daydreamers to shame!
LikeLike
Thanks, David! I seem to specialise in the category of “things that aren’t actually as useful as you thought they would be.”
LikeLike